So, you’re ready to leave your iPhone for greener pastures — specifically, the bright green hue of Google’s Android ecosystem.
It’s a major move, to be sure, but it doesn’t have to be daunting. Beneath the surface-level differences, Android and iOS actually have a lot in common — and with the right steps, you can switch from an iPhone to an Android device without losing anything significant (including your sanity).
(In case you’re looking to move the other way, check out our Android to iPhone switching guide.)
Make your way through this easy-to-follow guide, and you’ll be happily settled in your new high-tech home in no time.
iOS-to-Android options and instructions
• All-in-one iOS-to-Android switching tools
• Manual move: Calendar, contacts, and photos
• Manual move: Email
• Manual move: Messaging
• Manual move: Files
• Manual move: Apps
• Manual move: Music
• Welcome to Android
Now, let’s get started!
All-in-one iOS-to-Android switching tools
First things first: Google itself now offers a universal iOS-to-Android switching service that works with any device running 2020’s Android 12 software or higher. That’s hands-down the simplest way to get everything from your old iPhone onto your new Android device in one fell swoop and with the least amount of hassle possible.
If you’re moving into a Samsung-made Android phone, specifically, Samsung also offers its own app for iPhone-to-Android migration that’s available as an alternative.
Those two options are generally the smartest places to start — but they aren’t available for every phone, and they don’t always work flawlessly or across all of the areas relevant to your needs. So next, we’ll get into the step-by-step details of how you can get every important category of data moved over on your own, bit by bit, without giving yourself a migraine.
Calendar, contacts, and photos
We’ll start with a simple three-for-one special. Believe it or not, the core categories of calendar, contacts, and photos are among the easiest things to migrate from iOS to Android.
All you’ve gotta do is install the Google One app onto your iPhone, then sign into the app using your primary Google account. (If you don’t yet have a Google account, the app will give you the opportunity to create one.)
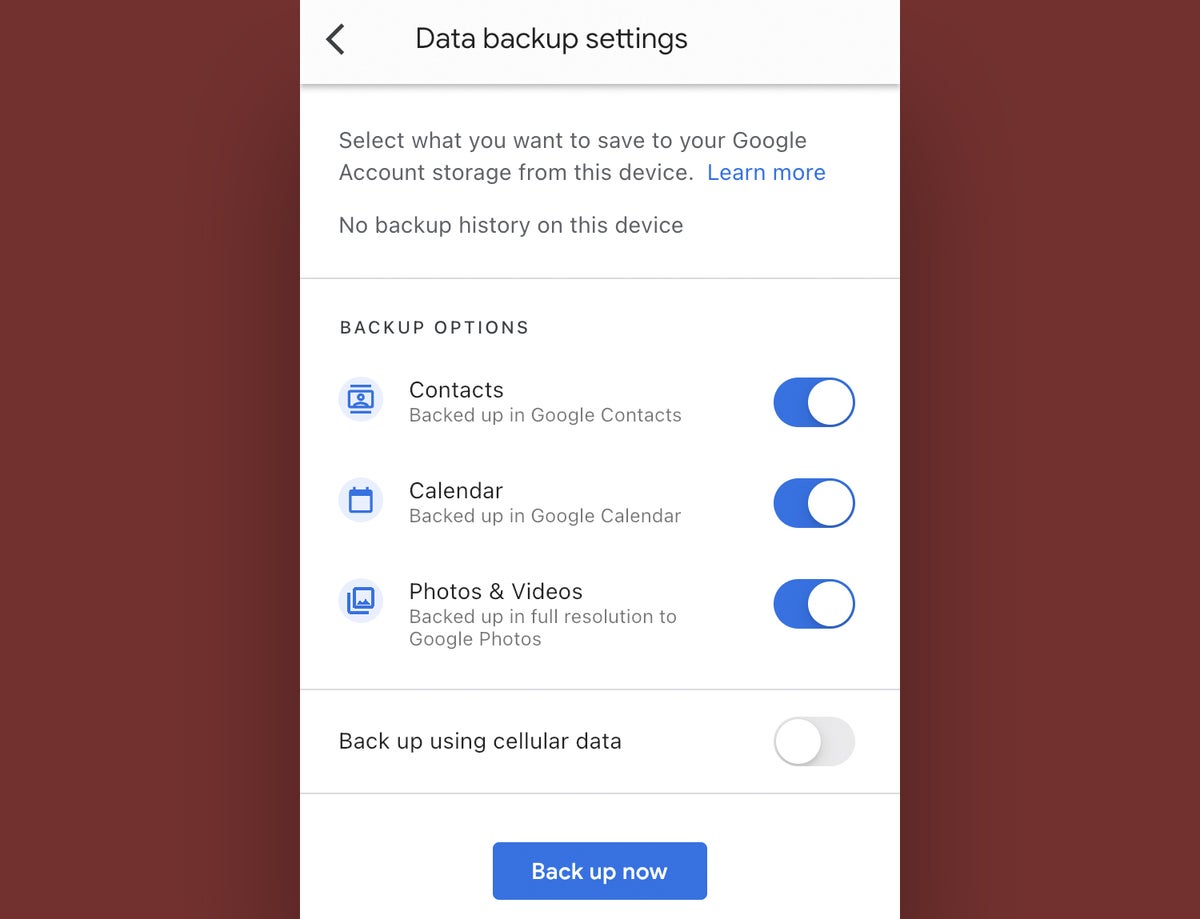
On your iPhone, open the Google One app and tap the « Set up data backup » option on the screen that comes up. You can then select all of the associated areas and tap the blue button to begin the process.
 JR Raphael / IDG
The Google One iOS app provides an easy way to move your calendar, contacts, and photos data over to Android.
Your backup may take a while and burn through a fair amount of data — and you have to leave the Google One app open and active the entire time — so you’ll probably want to save it for a time when your phone can be plugged in, connected to a reliable Wi-Fi network, and not immediately needed for anything else.
All done? Excellent: Now just sign into your new Android phone with that same Google account. You should be able to find your calendar data in the Google Calendar app, your contacts data in the Google Contacts app, and all of your photos and videos in the Google Photos app. (Depending on your device, those apps may or may not all be preinstalled by default. If you don’t see any of them on your home screen or in your app drawer, just head over to the Google Play Store to install it.)
One exception to the rule: If your contacts or calendar data is connected to a Microsoft Exchange account, it won’t be moved over as part of this process. In that scenario, you’ll need to add your Exchange account into the Gmail app on your Android phone (see the next section for more detail), and your contacts and calendar info should then automatically show up in the appropriate places.
All right — ready to bring all of your email over to your shiny new smartphone? That migration will range from « ridiculously simple » to « relatively hassle-free, » depending on the specifics of your setup.
Choose your own adventure:
If you’re currently using Gmail: There’s nothing to do; just make sure you sign into your Android device with the same Google account associated with your Gmail address, and all your mail will automatically appear in the Android Gmail app and be waiting for you. If you have more than one Gmail address and want to be able to access them all on the phone, open the Gmail app’s settings and look for the « Add account » option, then follow the steps to add any additional Google accounts into the mix.
If you’re currently using a webmail provider like Outlook.com, Hotmail, or Yahoo: Add the account into the Gmail app on your new phone, using the same steps described above but selecting the appropriate account option on the « Add account » screen.
 JR Raphael / IDG
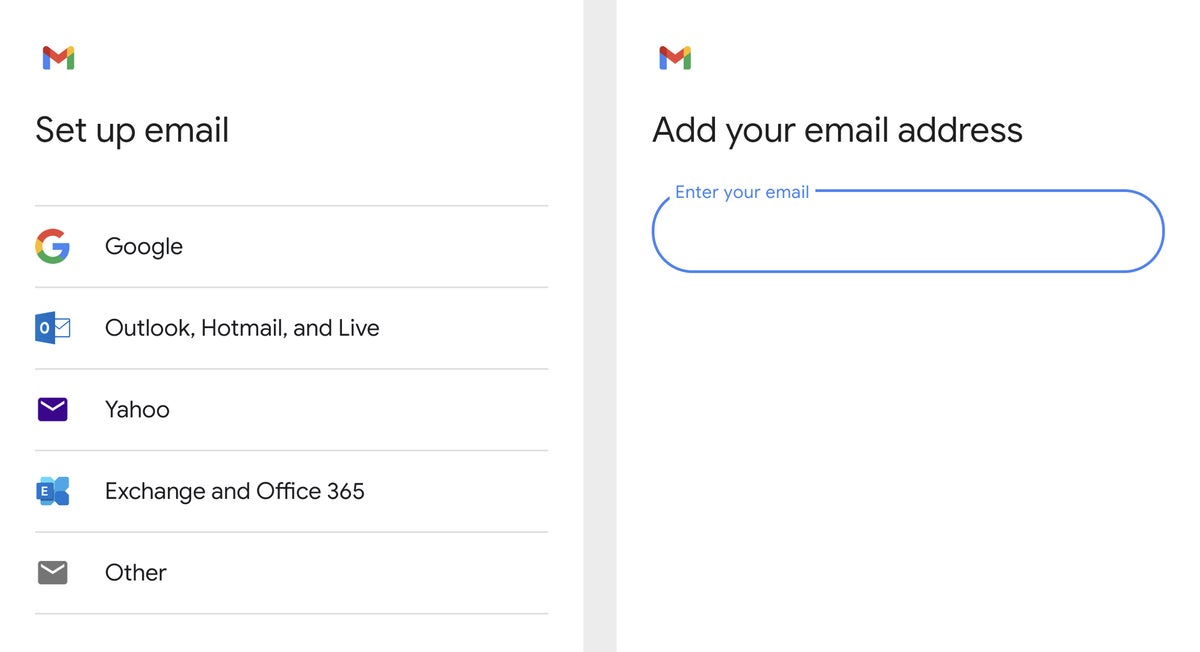
The Gmail app provides options for connecting different types of email accounts to your Android device.
If you’re currently using Apple Mail: Once again, just add the account into the Gmail app on your Android phone using the « Other » option. If the app doesn’t immediately accept your credentials, you might have to do a bit of extra manual setup: After typing in your email address, select « Personal (IMAP) » — then put in the various mail server settings provided on Apple’s support site.
If you’re currently using Exchange: Same basic deal, but select the option for « Exchange and Office 365 » in the « Add account » section of the Gmail app’s settings. The app will walk you through the rest of the setup procedure. Of course, you can also opt to use Microsoft’s official Outlook Android app if you’re accustomed to that program and want a consistent experience.
One final option to consider: If you’re using any of the aforementioned non-Gmail account types and want to ditch your old address and move entirely into Gmail, you can import all of your old account’s email into Gmail by following the steps on this Google support page. You may also want to instruct your old mail service to forward all new messages to your Gmail address so you don’t miss any important missives from people who haven’t yet learned about your move.
Messaging
Not surprisingly, Apple’s iMessage system doesn’t play nicely with non-Apple platforms. (See: the squabble over Android to iPhone texting.) But that doesn’t mean it’s impossible to leave; you just have to take the right set of steps to avoid missing-message misery.
First, go into Settings on your iPhone, tap « Messages, » and then toggle « iMessage » to off. While you’re in Settings, you’ll probably want to look for the « FaceTime » option and toggle it to off, too, since you presumably won’t be active on that platform anymore.
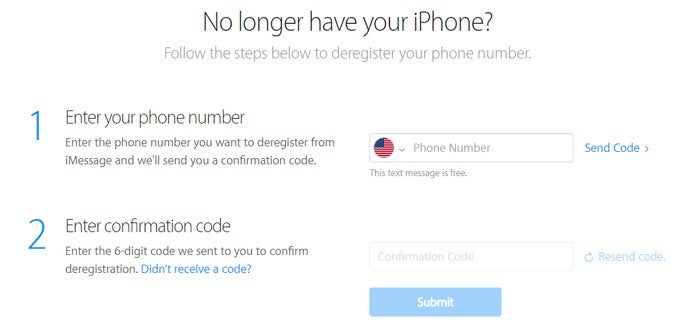
Second, open Apple’s « Deregister iMessage » web page and scroll down to the section labeled « No longer have your iPhone? » Put in your phone number, click the link to send a confirmation code, and then type the confirmation code you receive into the page.
Both of these steps are critical; if you don’t complete them, Apple will likely intercept at least some of your incoming text messages, and you’ll never even know you missed ’em.
 JR Raphael/IDG
Get your phone number out of the iMessage system or forever wonder if Apple is snatching your messages.
If you want to keep all of your existing text messages and bring them over to your new phone, an app called iSMS2droid can get the job done. The process is a bit gnarly and involves manually backing up your iPhone to a computer, then finding specific files and transferring them onto your Android phone — but if you really need to save all your old messages, it’s about the best option you have.
The silver lining is that once you’re on Android, keeping your messages synced and available on any device can be thought-free. Just be sure to pick a messaging app that automatically backs up and restores data from the get-go, and you’ll be fine as wine.
Files
So long, iCloud Drive — hello, Google Drive. The most direct way to get all your data off of Apple’s cloud storage service and onto Google’s is to install the desktop apps for both iCloud Drive and Google Drive on your Mac or Windows PC. Then, open Finder or File Explorer windows for both locations, select everything from iCloud Drive, and drag it over to Google Drive.
Wait for the transfer to finish, and that’s it: Every one of your precious files is now available via Google Drive on Android (as well as on iOS and the web).
Apps
The bad news: Any apps you’ve installed on your iPhone won’t automatically transfer over to Android, and any apps you’ve paid for on iOS will likely have to be purchased again.
The good news: These days, most major productivity apps are readily available on both platforms. And once you’re all set up with Android, all of your apps and app data will automatically sync with Google’s servers and follow you to any future Android devices.
Take a few minutes to go through Google’s Play Store — either on your Android phone or via a web browser on any computer — and search for the apps you want. If you install an app onto your phone and it asks you to sign in when you first open it, make sure to use the same username or email address you used on your iPhone so that any data tied to your account will carry over.
After you’ve settled in, you may want to explore a bit further beyond the apps you already know. Unlike iOS, Android allows you to use all sorts of clever tools for customizing and controlling the core user interface and even completely replacing your home screen environment with something more well-suited to your specific style of working. That opens the door to some intriguing forms of personalization that can enhance your efficiency in pretty interesting ways.
Music
Thank your lucky stars, because bringing music over from iOS to Android is no longer the absolute nightmare it once was.
There’s nothing to it if you use a streaming service like Spotify, Pandora, YouTube Music, or even — amazingly — Apple Music: Just download the equivalent app from the Google Play Store, sign in, and your entire collection will be at your fingertips in seconds.
If you have your own personal music collection, you can upload most common file formats directly to the YouTube Music website on a computer. Once you’re signed in, just click your profile picture in the upper-right corner and select « Upload music » to get started. The service currently supports MP3 files as well as files saved as FLAC, M4A, OGG, and WMA.
The main area where you’ll run into trouble is with music purchased from iTunes prior to 2009, as such songs were encoded into a proprietary and DRM-protected AAC format. Those files, by design, won’t be compatible with any other music service.
Your best option there is to find the same songs in YouTube Music and simply add them into your library as part of your cloud-based streaming collection. If that isn’t possible, you can always employ the old-school workaround of burning any such tracks to a CD (assuming your computer still has a CD burner, of course), then putting the CD back into the computer and ripping the songs into a standard unlocked format.
That’ll result in lower-quality audio than you’d get purchasing the tunes directly from almost any music service nowadays, but — well, it is what it is.
Welcome to Android
Well, wouldya look at that? You’ve done it! All your important info is now off your iPhone and on your new Android device, and you’re ready to start anew as a card-carrying Android phone owner.
Before we bid adieu and send you scampering off on your new adventure, let’s take a moment to go over a few things of note as you learn your way around this wild new world.
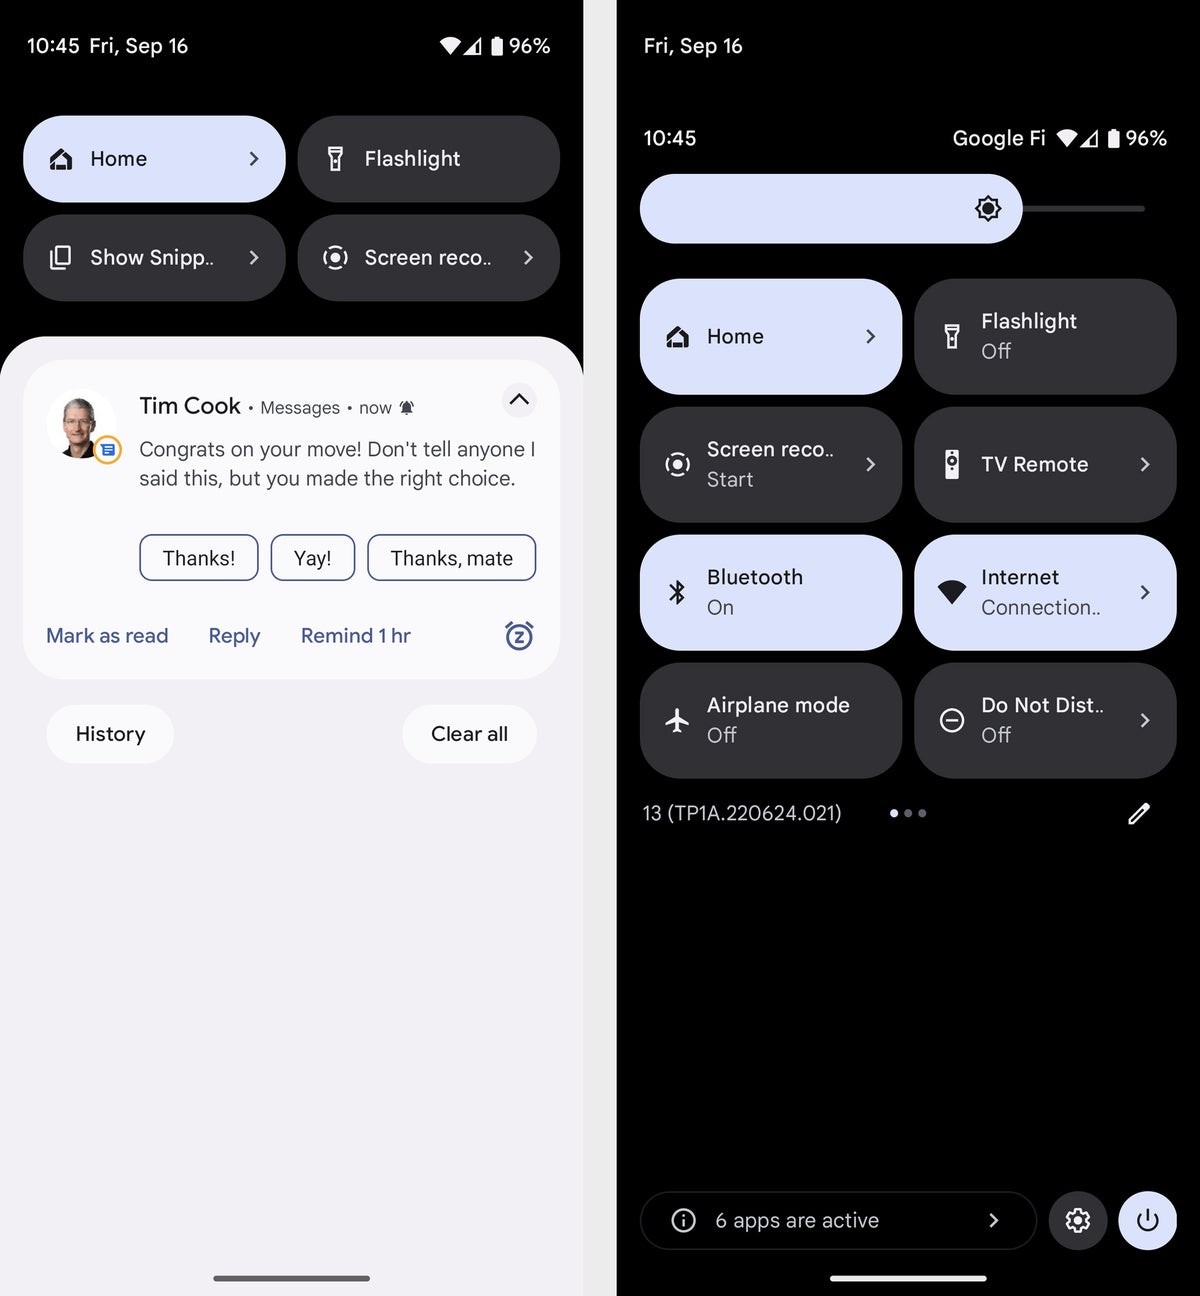
First, the getting-around basics: No matter where you are in Android, you can always swipe down once from the top of the screen to see any pending notifications and swipe down a second time to see the full Quick Settings panel. And speaking of notifications, Android makes them exceptionally easy to control — so learn the ins and outs of notification management and don’t let your phone’s alerts control you.
 JR Raphael / IDG
Android’s notifications panel (left) and Quick Settings panel (right) are never more than a swipe away. (Their exact appearance may vary from one phone to the next.)
All reasonably recent Android versions include what’s sure to be a somewhat familiar-seeming gesture-driven system for getting around your phone: From anywhere in the operating system, you can flick your finger upward from the bottom of the screen to return to your home screen or swipe upward about an inch from the bottom of the screen and then stop to open the system Overview interface and browse through your recently used apps.
You can also swipe inward from the left or right side of the screen to move back one step in whatever you’re doing. And you can find lots of other little tricks for making the most of Android gestures in this quick ‘n’ simple guide.
On phones with quite old Android versions — or those where gesture navigation isn’t enabled by default — you’ll find three buttons along the bottom of your screen that provide tap-friendly ways of accessing those same basic functions. If you see that sort of interface setup, it’s well worth your while to look in the device’s settings to see if gesture navigation is available, as you’ll likely find it to be much more intuitive and similar to what you’re accustomed to using.
One more thing: You’ve no doubt seen some scary-seeming stories about Android security. Be aware: Most of that stuff is overly sensationalized and woefully misleading. Malware really isn’t a real-world issue on Android, and Google has its own multilayer security system in place to protect you from all sorts of threats — including the most realistic one of all: a lost phone.
Craving even more practical tips and foundational knowledge? My, aren’t you a tenacious little monkey! Check out the following Computerworld guides to continue your Android optimization education:
This article was originally published in August 2017 and most recently updated in October 2022.
Copyright © 2023 IDG Communications, Inc.


