With every new Android version comes a flurry of fancy fresh features. Some of them immediately transform the way we work, while others just quietly fade away without making much noise.
And then there are the features that fall somewhere in between — features that seem useful, maybe even pique our interest when we first hear about ’em, but then get lost in the shuffle and forgotten as time wears on. Especially when said features are out of sight and not at all obvious, they’re all too easy to overlook and abandon.
Well, as we look ahead to the launch of yet another new Android version — Android 14, now available in an early beta and expected to land in earnest sometime this summer — consider this your friendly reminder: These hidden Android features, added into the operating system at various points over the past several years, are still there and still incredibly handy. And you don’t need any sort of shiny new software to see ’em.
Take a moment to rediscover these timeless treasures and remind yourself what you’ve been missing.
Hidden Android feature No. 1: Fast app-switching
One of the most useful features to come into Android in ages is also one of the least well-known and discoverable. I’m talkin’ about the Alt-Tab-like fast app-switching function that was first introduced way back in 2016’s Android 7 and remains one of my favorite Android shortcuts to this day.
[Psst: Love shortcuts? My free Android Shortcut Supercourse will teach you tons of invisible time-savers for your phone. Get your first lesson now!]
You can be forgiven if you forgot about it — or maybe never even knew about it in the first place — ’cause honestly, there’s absolutely nothing that’d clue you into its existence. And it’s evolved a fair amount over the years, too, which makes the odds of losing track of it even greater.
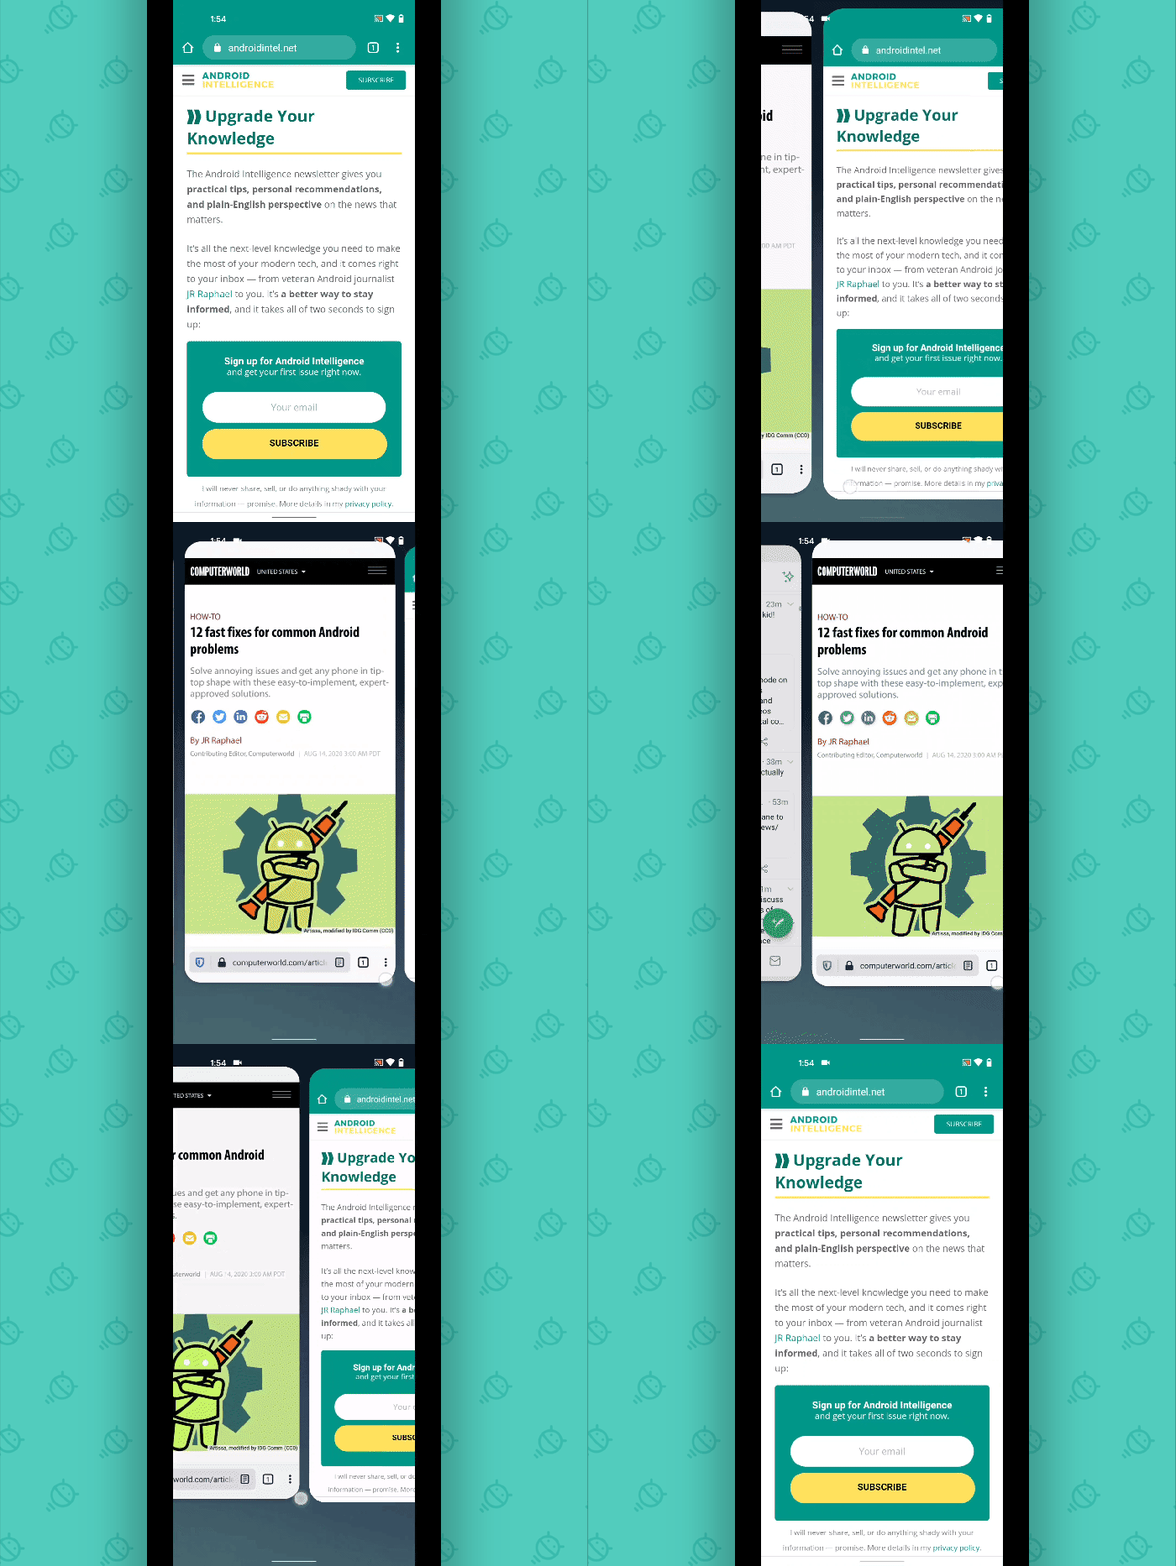
So here’s how it works: First, if you’re using Android’s current gesture system — with no on-screen navigation buttons and just a thin little line at the bottom of your screen — flick your finger toward the right anywhere along that bottom-of-screen area. That’ll snap you back to your most recently used app faster than you can say « frugal Google bugle filled with tasty kugel » (which, to be fair, isn’t something you can say especially quickly). From there, you can click flick toward the right again to go back another step in your app-using history or flick to the left to snap back in the other direction.
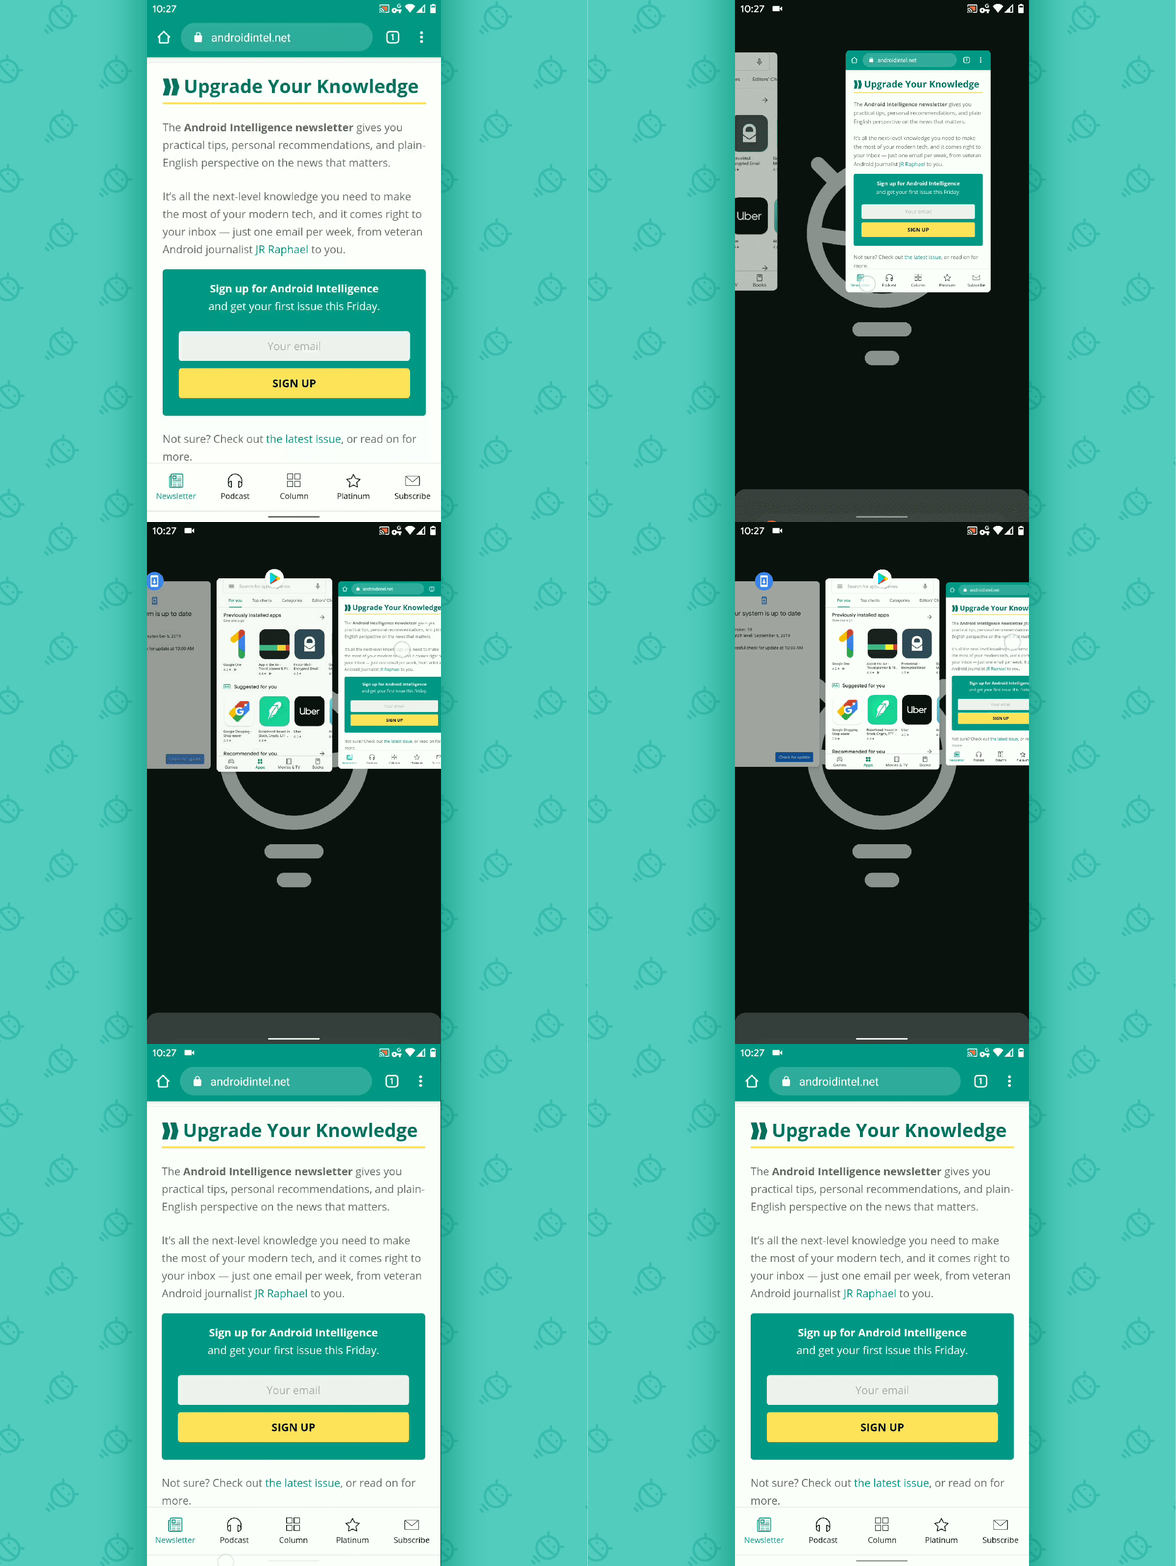
You can also do less of a flick and more of an arching swipe — moving your finger upward, ever so slightly, as you slide toward the left or the right on the bottom of the screen — if you want to get a better look at the apps in the list before making the switch.
 JR
JR The farther you swipe and the higher you go, the more apps you’ll see — all in the order of when you last used ’em.
 JR
JR If you’re still using Android’s older three-button navigation system, fear not, for you can do this, too — part of it, anyway: Just double-tap the Overview key (the square-shaped icon next to Back and Home) anytime to quickly zap between your two most recently used processes.
Hidden Android feature No. 2: App shortcuts
Speaking of app-related shortcuts, Android has an exceptionally efficient system called — rather fittingly — App Shortcuts. These splendid little suckers are completely hidden out of sight, though, and they’re consequently ignored more often than not.
But Goog almighty, can they be useful. You can think of App Shortcuts as direct links to specific functions within apps on your phone — ways to get to individual actions or areas within an app without having to go through the typical process of opening it up, hunting around through its menus, and tapping multiple commands to reach your destination.
To look through your App Shortcut options, press and hold your finger down on any app’s icon — either on your home screen or in your app drawer — for about a second. The options vary from one app to the next, but you’re bound to find some fantastic possibilities. For instance:
- With Google’s Messages app, long-pressing the app’s icon lets you jump directly into a variety of recently used message threads.
- With Google Docs, you can hop straight into a new document or to the service’s search function without having to first open the app and poke around.
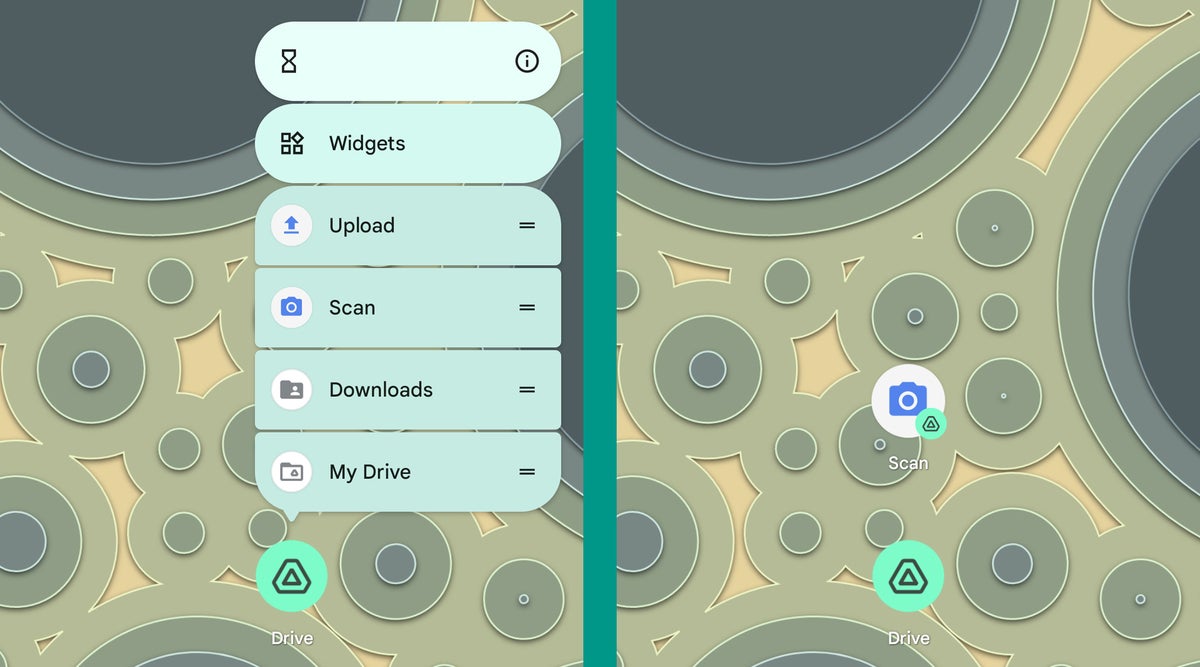
- With Google Drive, you can get direct links for searching, uploading a new file, or even scanning a physical document with your phone’s camera.
- And with Google Calendar, you can create a new event, a new task, or a new reminder right from that hidden long-press menu.
The list goes on from there, so take the time to tap around and explore what shortcuts your specific apps have to offer. And when you find a shortcut that seems especially useful for the way you work, remember this extra invisible trick: You can pull any shortcut out of an app’s long-press menu and put it directly on your home screen for even easier one-tap access. Just press and hold the shortcut you want and then drag it into any open space on your home screen.
 JR
JRGood to know, right?!
Hidden Android feature No. 3: Live Caption
Google’s Android 10 release introduced an unexpected gem into the operating system — something that has the potential to be way more useful than you’d expect at first glance. It’s called Live Caption, and it’s technically an accessibility feature for folks who have a hard time hearing.
The benefit in that scenario is obvious, but Live Caption can also come in handy for practically anyone on a day-to-day basis — because what it effectively does is allow you to see what a video or podcast is saying without having any audible sound playing from your phone. I’ll often flip it on briefly when I want to « listen in » to some manner of multimedia while I don’t have headphones handy and am in a situation where blaring sound out from my phone’s speakers wouldn’t exactly be optimal (a novel thought for someone to have these days, I realize).
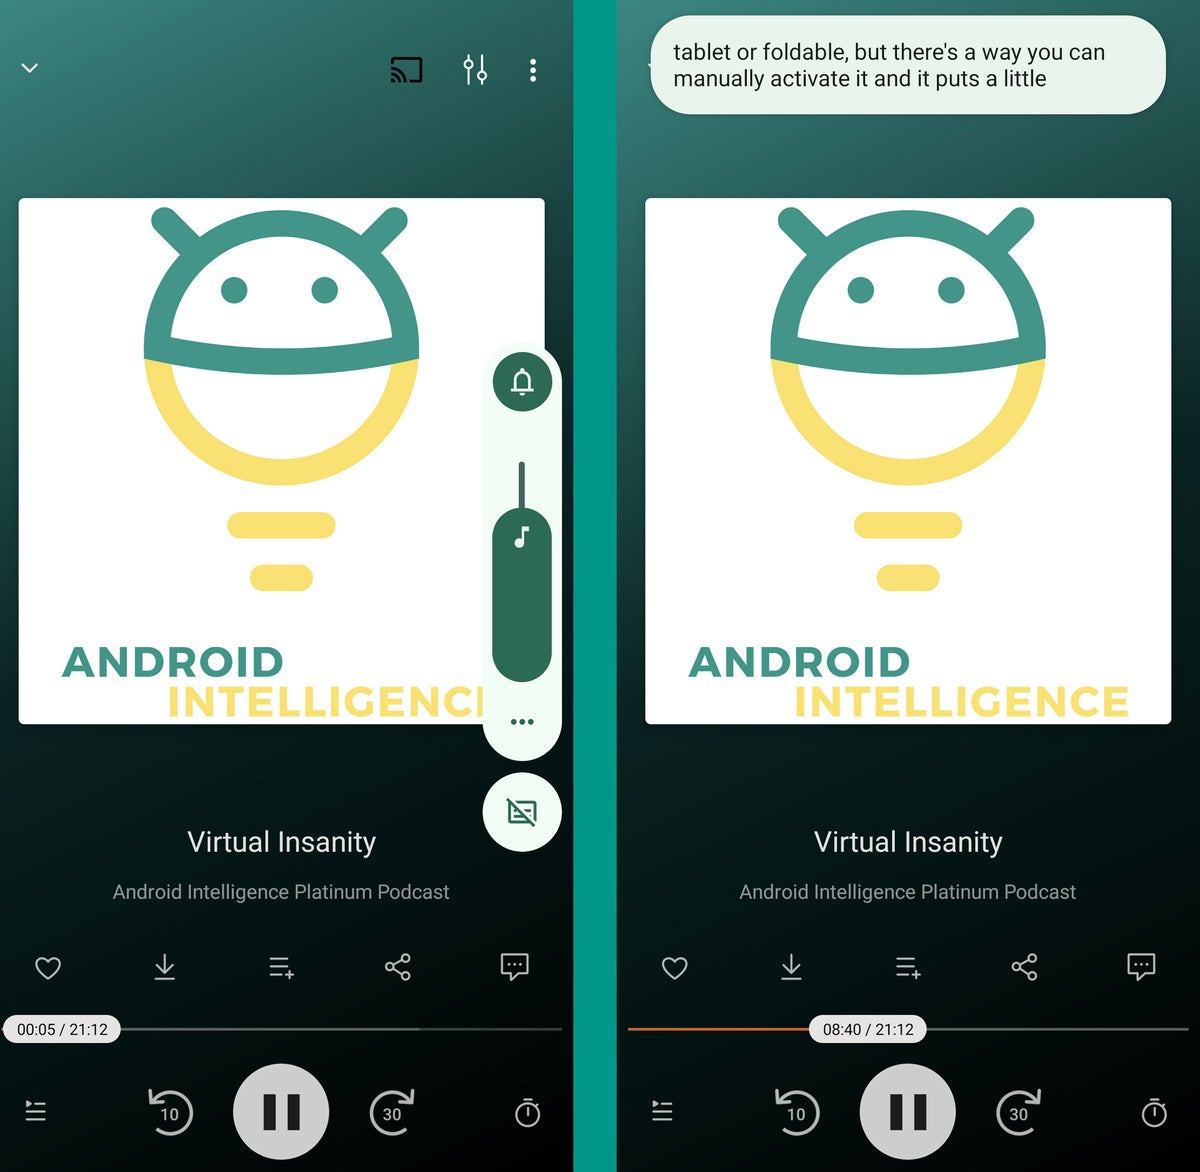
In such moments, all I’ve gotta do is tap a little box that shows up beneath the volume controls whenever any kind of media is playing on my device — and holy moly, wouldya look at that?
 JR
JROnce that button’s pressed, every word uttered in the video or audio clip shows up on my screen so I can read it whilst having the actual sound turned all the way down.
And y’know what? Let’s take this hidden-feature concept a step further, ’cause there are actually two more easy-to-miss possibilities within this system. Once you’ve got Live Caption activated and you’re seeing captions on your screen, you can double-tap the caption box to make it bigger — or press and hold your finger onto the box to move it around anywhere on your screen. Whee!
If you’re using a phone with Android 10 or higher and you aren’t seeing that Live Caption option as part of your volume controls, head into your system settings and search for Live Caption there. You’ll probably need to find the associated section and flip a toggle into the on position within it to activate the feature — and, depending on your device (hi, Samsung folk!), you might also have to activate a second toggle in that same area to make sure the Live Caption option actually shows up as part of your volume panel.
On Samsung phones, you’ll also have to expand your volume panel (by tapping the little three-horizontal-box icon within it) to find the Live Caption option.
No matter what type of phone you’re using, though, remember: Live Caption will only show up and work when some manner of sound is actively being played.
This next tucked-away treat was first added into Android way back in the 2016 Nougat era but then taken away for a while and only brought back with 2021’s Android 11 release. (Goodness gracious, Google: You’re makin’ me dizzy!)
It’s the ability to customize the order of apps in your phone’s system-level Share menu — which means you can then keep your own most frequently used sharing destinations at the top of the list for easy ongoing access. Hip, hip, hoorah!
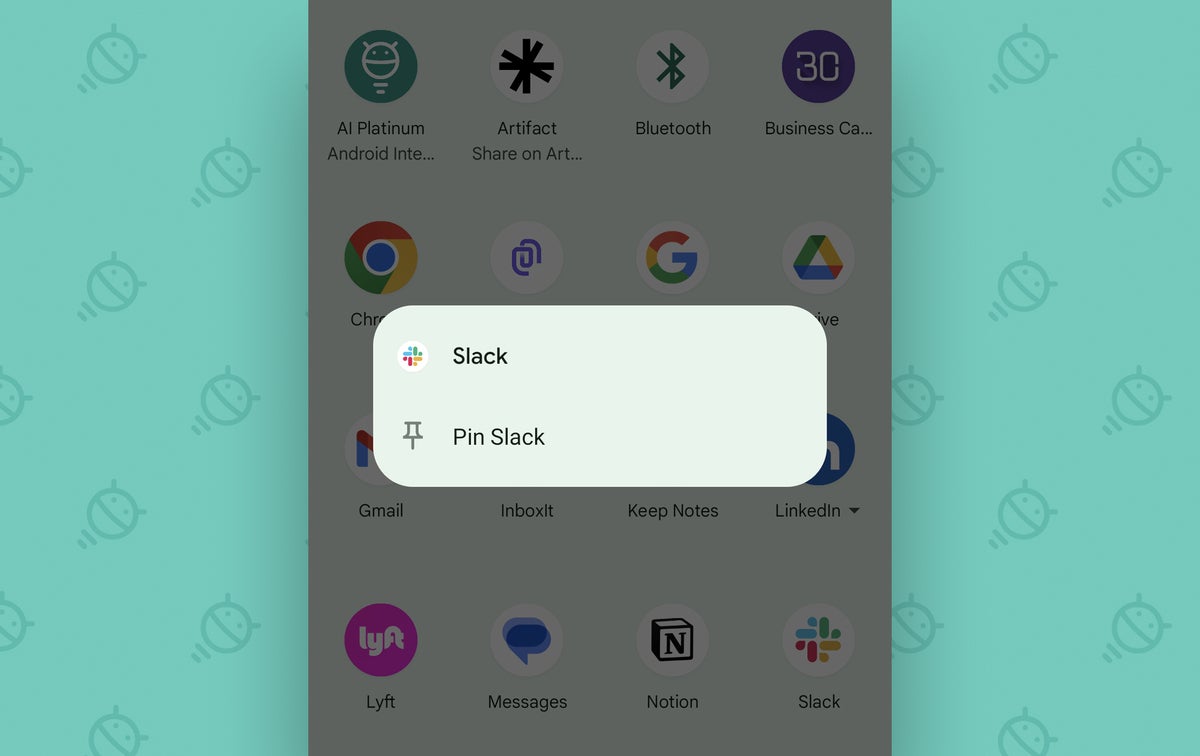
The feature is unfortunately complicated by the fact that lots of apps, including many of Google’s own utilities, now use custom share interfaces instead of relying on the system standard (grumble, grumble, grumble). But for any app that’s actually doing things in a sensible way and using the standard Android share menu, take note: So long as your phone is running Android 11 or higher, you can press and hold your favorite fingie onto any item within that sharing list to pin it to the top. And it’ll then stay in that spot for all future sharing, anytime the standard system menu is used.
To see for yourself, go highlight some text within an email in Gmail and select « Share » from the menu that comes up. Then press and hold that perfect little pointer of yours down onto any app you see in the list of sharing options — and, ta-da:
 JR
JRYou’ll see the command to pin it. You can pin up to four different sharing targets, if you want, and they’ll all appear in alphabetical order in a special row at the top of that menu.
Hidden Android feature No 5: App pinning
An oft-overlooked feature introduced all the way back in 2014’s Android 5 release (mmm, Lollipop…) is a little somethin’ called app pinning. It lets you lock one specific app or process to your screen and then requires you to unlock your device before anything else can be accessed.
The idea is actually quite sensible: Say you’re passing your phone off to a friend, a co-worker, or some manner of rabid jungle bird — maybe so they can see a document, look at something on a website, or peck out a quick call whilst their own tiny bird-phone isn’t handy. Take two seconds to pin whatever app is relevant to that purpose to your screen, and you can rest easy knowing the rest of your stuff will remain secure and inaccessible until the phone’s back in your own paws.
To use the feature, first search your system settings for app pinning — or, if you’re using a Samsung phone (where things are always arbitrarily renamed for no apparent reason), search instead for pin app.
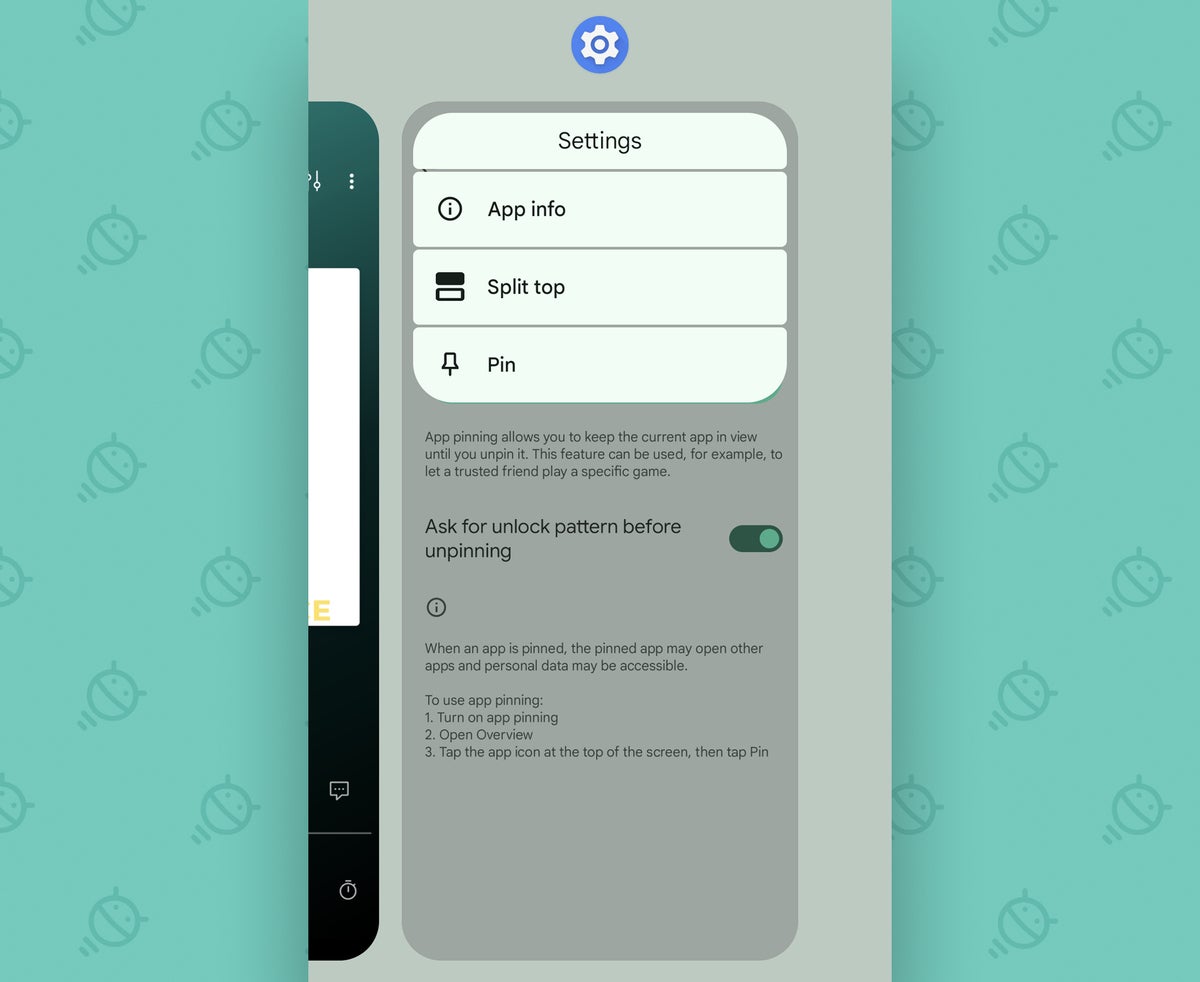
However you get there, once you’re on the right settings screen, make sure the main toggle for the feature is activated and also make sure the toggle next to « Ask for unlock pattern before unpinning » (or « Use screen lock type to unpin, » with Samsung — ’cause, well, y’know) is also in the on position.
Then just open up any app you want and head into Android’s Overview interface (by swiping up from the bottom of your screen with the current Android gesture setup or by tapping the square-shaped button at the bottom of the screen with the old legacy three-button nav approach). Tap the icon at the top of the card for your current app, and lookie what we have there: a snazzy new Pin option!
 JR
JRTap that bad boy, and tap it good. That app will then be locked in place, and to get to anything else, you’ll first have to swipe your finger up from the bottom of the screen and hold it in place for a few seconds — and then provide whatever manner of unlocking authentication (PIN, pattern, password, appendage, 14 drops of blood from your pinky toe, etc) is appropriate to continue.
If you’re still using Android’s old three-button nav system, you’ll instead press the square-shaped Overview button to get to the Overview interface, and you’ll press and hold the Back and Overview buttons together when you’re ready to unpin.
Hidden Android feature No. 6: Split screen
While we’re thinkin’ about that little Overview menu, jot this down on your noggin’s chalkboard: That same area of the operating system holds a helpful feature that I suspect 99% of Android-carrying creatures completely forget about on a day-to-day basis.
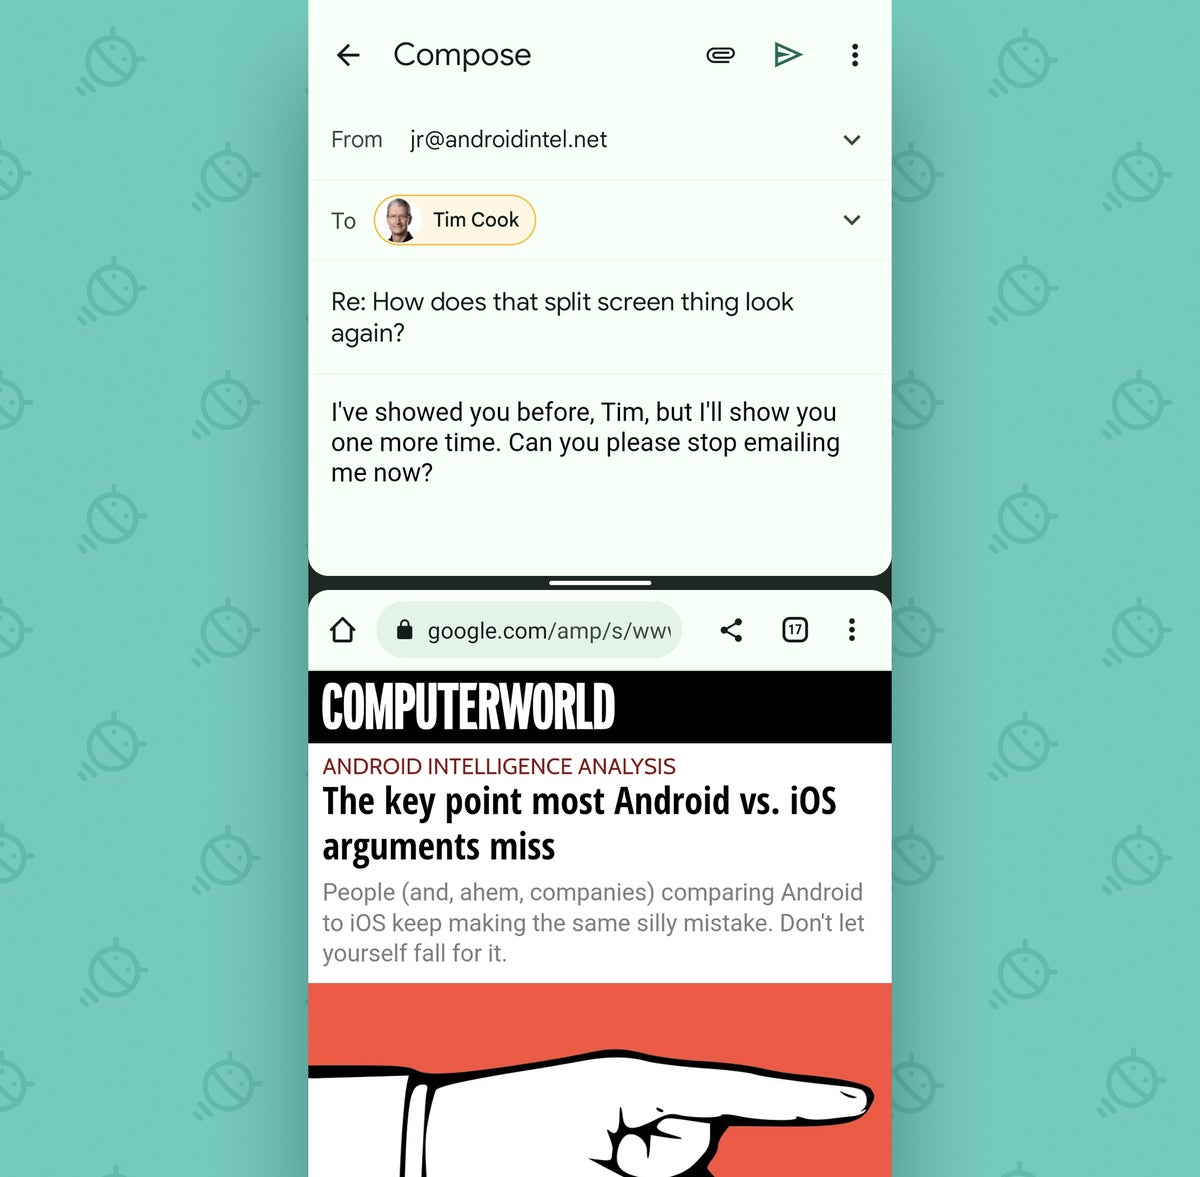
The feature of which we speak is Android’s long-standing split-screen mode, which lets you view two apps on your screen at the same time. Depending on your device and specific Android version, it could be labeled as « Split top, » « Open in split screen view, » or « Splitsy ditsy » (though that last one exists mainly in my own demented man-brain).
Tap the icon at the top of Overview for any app, find and tap that screen-splitting command, then decide which second app you want to share your screen — and last but not least, bask in the glory of your newfound superpowers.
 JR
JRNote, too, that in certain situations, you can actually use split screen with two different instances of the same single app. With Chrome, for instance, you can view two different tabs on your screen together. And with Gmail, you can view an active email draft along with your inbox.
And all you’ve gotta do is remember to do it.
Hidden Android feature No. 7: Guest Mode
Back to the app pinning possibility from a second ago: If you really want to keep your device protected from meddling while it’s in someone else’s hands and/or claws, take a minute to reacquaint yourself with Android’s clever and practical Guest Mode.
Guest Mode is basically like an incognito environment for your entire phone: You just flip a switch, say « Wowser bowser, hubba bubba » for good measure, and then watch your phone shift itself into a blank-slate state — where your own personal apps, accounts, and data are all securely tucked away and you get an out-of-the-box-like experience, with only the basic preinstalled system apps available.
No one can get to any of your stuff without first signing back in as you (and putting in your preferred method of authentication), and nothing done in that environment ever has any impact on your standard smartphone setup. It’s a pretty powerful form of privacy protection, wouldn’t ya say?
It isn’t, unfortunately, available for the Samsung owners among us, as Samsung has for no apparent reason opted to remove this standard operating system element from its software — but for everyone else, follow these three quick steps:
- Open up the System section of your phone’s settings.
- Tap « Multiple users » — or if you don’t see that as an option, first tap « Advanced » and then look for it. (If your system settings menu structure is just completely different, try searching for guest mode within the settings area.)
- On the screen that comes up, make sure the toggle at the top is set in the on position.
And then, whenever you want to tap into your snazzy new Guest Mode option, swipe down twice from the top of your screen to open your Quick Settings, tap your user profile picture (which is probably just a generic person icon in the lower-right corner of the panel), and then tap the « Add guest » option on the screen that comes up.
When you’re ready to exit out of Guest Mode and get back to normal, just open up the Quick Settings panel again, tap that user profile picture again, and select « Remove guest » from the menu that comes up. That’ll erase and reset everything that was done in that temporary profile and take you back to your own standard environment (once you’ve put in your PIN, pattern, or passcode or used your preferred appendage to prove that you’re actually you).
Don’t miss part two
Still hungry for more exceptional out-of-sight Android features? Mosey your way over to the second part of this collection, which revolves entirely around notification-related enhancements.
And when you’re ready to unleash the awe-inspiring power of all your phone’s invisible shortcuts, scoot your boot over to my flavor-filled Android Shortcut Supercourse. It’ll give you six full days of eye-opening smartphone sorcery — completely free, from me to you.
Copyright © 2023 IDG Communications, Inc.


