So, you’ve got email, you say? Lots of it? More than you can possibly manage without losing the few metaphorical marbles still sloshing around in that soggy ol’ brain of yours?
I hear ya. In fact, I think we all can relate (even those of us whose brains are, erm, slightly less soggy). And I’m here to tell you: It doesn’t have to be so difficult.
Gmail has a variety of built-in tools for making your messages more manageable. Some of ’em are a little bit different from what you might be accustomed to using in more traditional email clients (here’s lookin’ at you, Outlook) — but if you take the time to figure out how they work, you might just be surprised at how effective they can be.
There’s no better example than Gmail’s label system. It’s a strange concept to wrap your head around at first, especially if you’re used to the more typical folder-based method of inbox organization, but here’s a little secret: Labels actually are folders, in a sense. That, however, is just one small part of their inbox-organizing power.
Think through these nine label-centric possibilities and get ready to see Gmail’s labels in a whole new light.
1. Use Gmail labels like super-folders for categorizing your email
First, the most basic Gmail label mindset to master: You can think of a label like a folder — but with an important twist: Instead of a message being placed into a label, the label is placed onto the message.
That subtle-seeming distinction is actually quite significant. What it means is that a message doesn’t have to be associated with only one label, as is typically the case with folders; rather, you can apply as many labels as you want to any message, and each one ends up acting like a sticker — a label, one might even say! — that sits atop the email along with any other labels you’ve applied.
 JR Raphael/IDG
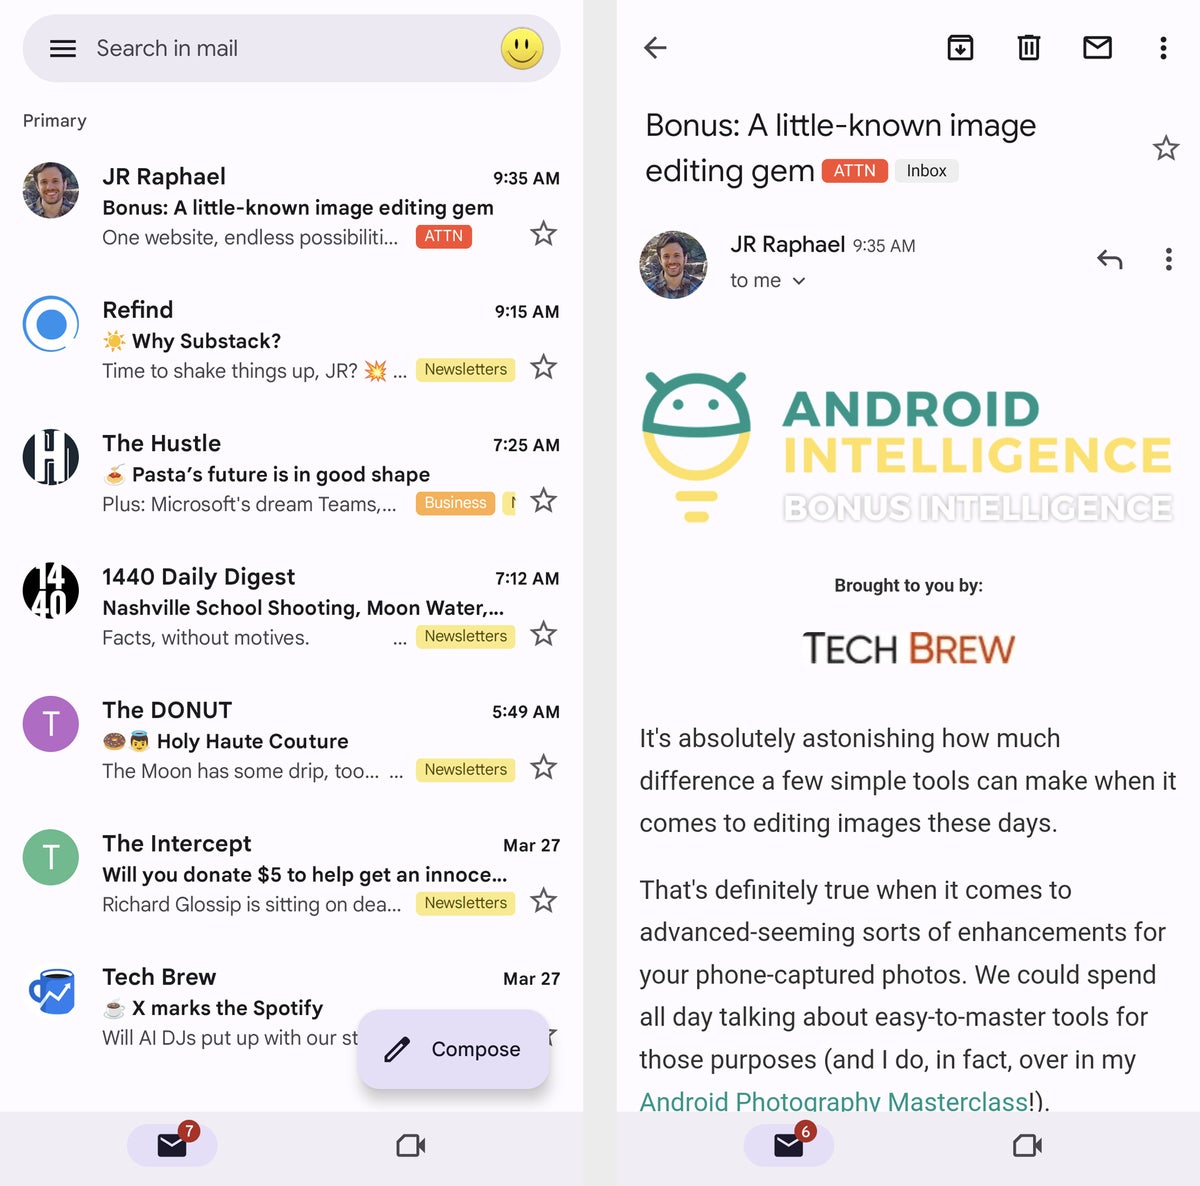
Any labels associated with an email will show up both in your inbox and when viewing the message in full.
So, for instance, if you keep tabs on stats for your company’s website, you might label all incoming emails from Google Analytics as « Web Reports. » But maybe you also have your own personal website for which you receive Analytics updates. You could label the reports from your personal website as « Web Reports, » too, and then add a second label of either « Work » or « Personal » onto every message to create a distinction between the two types.
On the Gmail desktop website, the easiest way to create a label is to click the label icon in the toolbar at the top of the screen when you’re viewing a message or when you’ve selected something from a message list — then start typing whatever name you want to use for the label. Once you’re done, simply hit Enter, and Gmail will create the label for you and apply it to the message.
 JR Raphael/IDG
Once you create a new label within Gmail, it’ll always show up as an option in the future.
The next time you click the label command, you’ll see your newly created label as an option.
You can also perform the same action by using the keyboard shortcut L while an email is open or selected, provided you’ve enabled Gmail’s keyboard shortcuts system.
On the mobile front, you can create a new label within the Gmail iOS app by tapping the three-line menu icon in the upper-left corner of the screen and then looking for the « Create new » option after the list of existing labels. You can apply an existing label onto a message, meanwhile, by looking for the « Label » option in the main three-dot menu anytime an email is open or selected.
The Gmail Android app strangely lacks the option to create a new label, but you can apply an existing label to a message by looking for the « Add label » option in the main three-dot menu anytime an email is open or selected — and if you really need to add or edit labels on the go, a free third-party app called eLabels will fill in that gap and give you that power.
2. Save yourself a step and label while archiving
Here’s a handy command to remember: If you want to add a label to a message and simultaneously dismiss the message from your inbox, use Gmail’s « Move to » option.
On the desktop website, that’s the icon showing an arrow inside a folder, directly to the left of the regular label icon. On both Android and iOS, you can find the same command within the three-dot menu icon while any email is open or selected. (It’s called « Move to » on Android but shortened to just « Move » on iOS, for some reason.) You’ll see a list of options that include your labels; just select the label you want to assign to the message.
Whatever platform you’re using, that’ll handle all the steps for you in one fell swoop. And if you’re a fan of shortcuts like this, by the way, I’ve got a whole story dedicated to time-saving Gmail tips just like ’em.
3. Apply labels while you’re composing an email
Gmail labels aren’t only for incoming messages; you can also proactively apply them to a new message you’re composing and then know that that email and any replies associated with it will remain properly organized and present in all the right places.
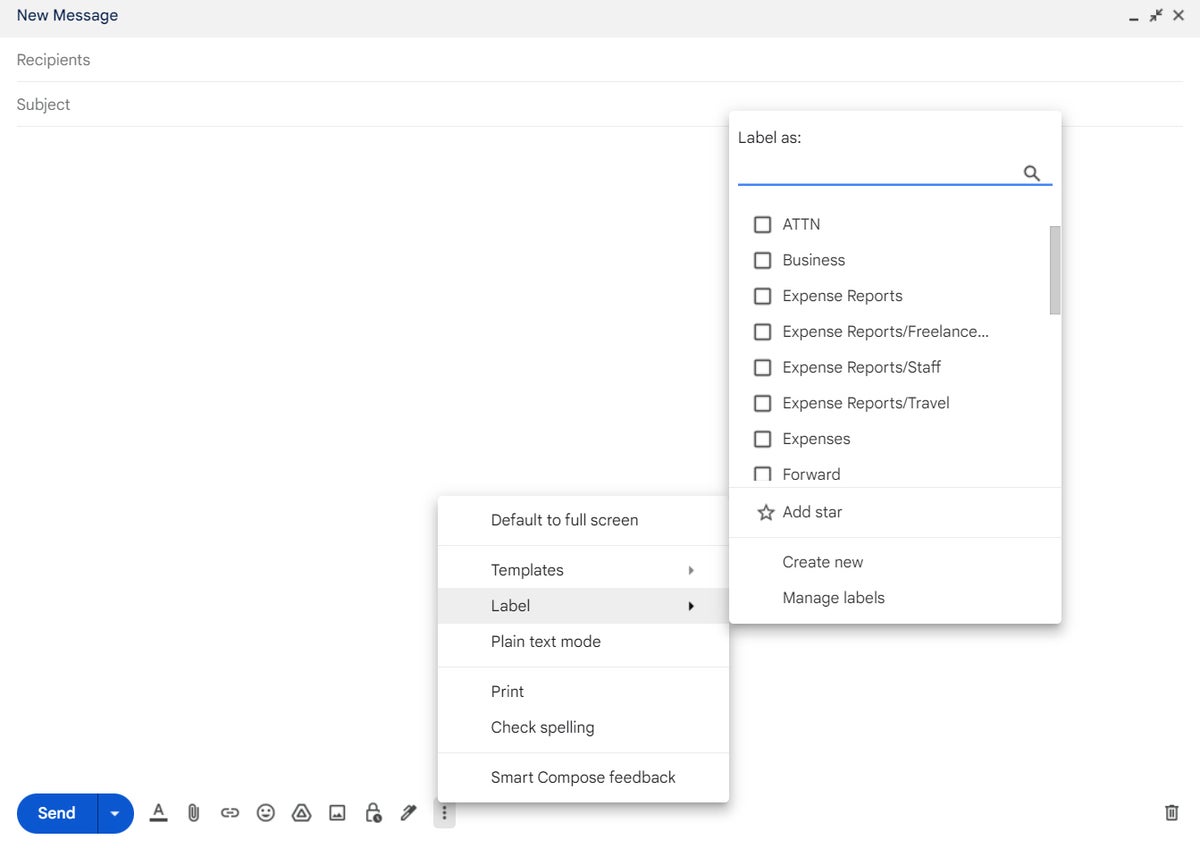
On the Gmail desktop website, all you’ve gotta do is hit the three-dot menu icon in the service’s compose window and look for the « Label » option in the list that appears — then create a new label right then and there or select any existing label to apply it.
 JR Raphael/IDG
You can proactively apply a label while composing a new message.
The mid-composing label-adding option isn’t present in the Gmail mobile apps, unfortunately, but you can accomplish the same thing in a roundabout way by heading into your Sent messages (from the app’s main three-line menu) and then selecting or opening an email to add a label onto it right after you’ve sent it.
4. Organize your label lists
All right, so you’ve got your messages labeled — now what? Well, first, you can always browse through your labels to find something you need. Gmail keeps your list of labels (in alphabetical order) in its left sidebar, on the desktop website. You can collapse or expand that sidebar by tapping the three-line menu icon in the upper-left corner of the screen, and you can click on any label in the list to see all of the messages associated with it.
By default, though, that list is probably quite the unruly mess. So let’s get it organized:
- First, if you see a line in the list of labels that says « More, » with a downward-facing arrow alongside it, click it to expand your full list of existing labels.
- Now, click the three-dot menu icon next to each one of your labels. (The three-dot icon appears only when you hover over a label.) Assign each label a color, if you’d like; that’ll make it more visually distinctive and give it more or less emphasis (depending on the color you choose) when it appears in your inbox.
- In that same three-dot menu, look at the « In label list » section and consider if you want the label to always appear in your label list, to remain permanently hidden beneath that « More » divider, or to appear in the list only when unread messages are present within it. The less unnecessary clutter you have visible, the easier it’ll be to find the labels you actually use often.
- Next, look at the « In message list » section and think about whether you want the label to show up as an option when you’re adding a label onto a message. If it isn’t a label you ever actively apply to messages, you might consider hiding it to reduce clutter and increase your efficiency in that area.
On Android or iOS, you can find your labels and browse through any of ’em by looking inside the Gmail app’s main three-line menu. On Android, the aforementioned eLabels app can also let you make more advanced label modifications from your phone or tablet, but in general, those sorts of adjustments are most easily managed from the Gmail desktop website.
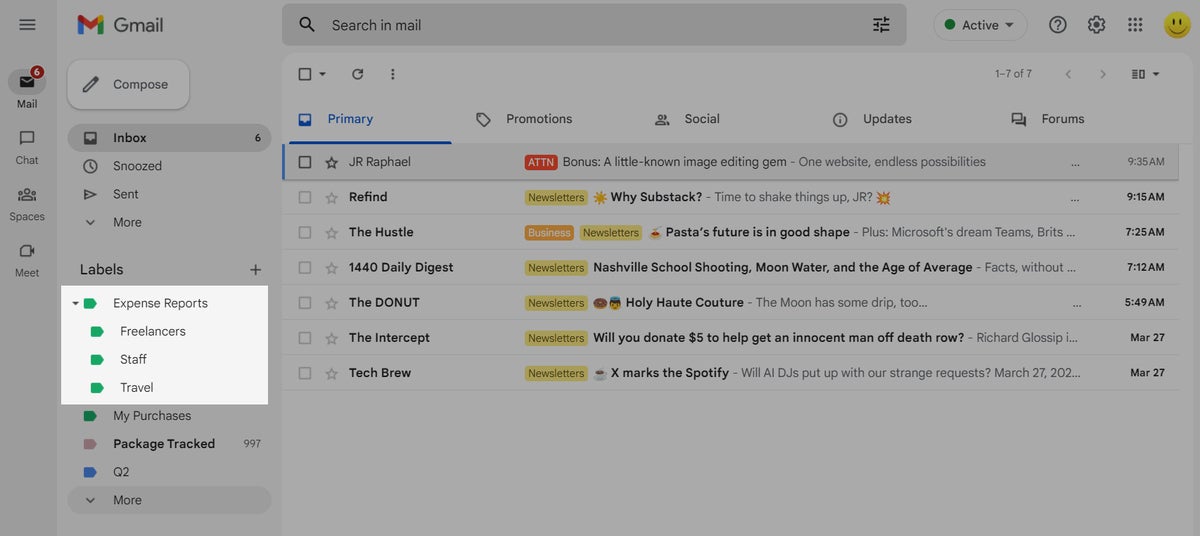
While we’re getting your labels organized, take a moment to mull over whether any of your labels would make more sense as sublabels within a broader category. Maybe, for instance, you’d have one label called « Expense Reports » and then sublabels within it for « Staff, » « Freelancers, » and « Travel. »
This is an adjustment you’ll absolutely want to make on the Gmail desktop website, where the full selection of label customization commands is readily available. You can find the option to create a sublabel by clicking the three-dot menu icon next to any label name within the site and then selecting « Add sublabel » from the list that appears.
 JR Raphael/IDG
Grouped sublabels are a great way to keep your Gmail labels list tidy.
Just note: Somewhat confusingly, sublabels and parent labels are treated as separate but related entities — so if you were to add a message to « Staff » in our previous example, its label would show up as being « Expense Reports/Staff. » The message wouldn’t, however, show up when you click « Expense Reports » in the left-of-screen label list; it’d appear only when you clicked « Staff » in that same section. If you wanted it to appear within the results for both the parent label and the sublabel, you’d have to add both of them onto the message.
6. Use labels for smarter searches
Gmail’s labels aren’t just for browsing; you can also use them as variables to narrow down a search and make it faster to find a message you need. To include a label as a variable in a search, just click or tap the Gmail search box at the top of the website or mobile app, type label:work (using the name of your actual label name in place of « work, » of course), and then type in any other term or variable you want.
If you were trying to find a travel-related expense report from Tim Cook’s trip to Chicago, for instance, you could type label:travel from:tim@apple.com chicago into the search box. Including the label would narrow down your search considerably — skipping over messages from Tim Cook that might’ve just mentioned Chicago in some other context — and let you get to what you need more efficiently.
You can even narrow down your search further and search for messages that contain multiple specific labels — like label:travel label:work, which would show you a list of all messages that have both of those labels in place.
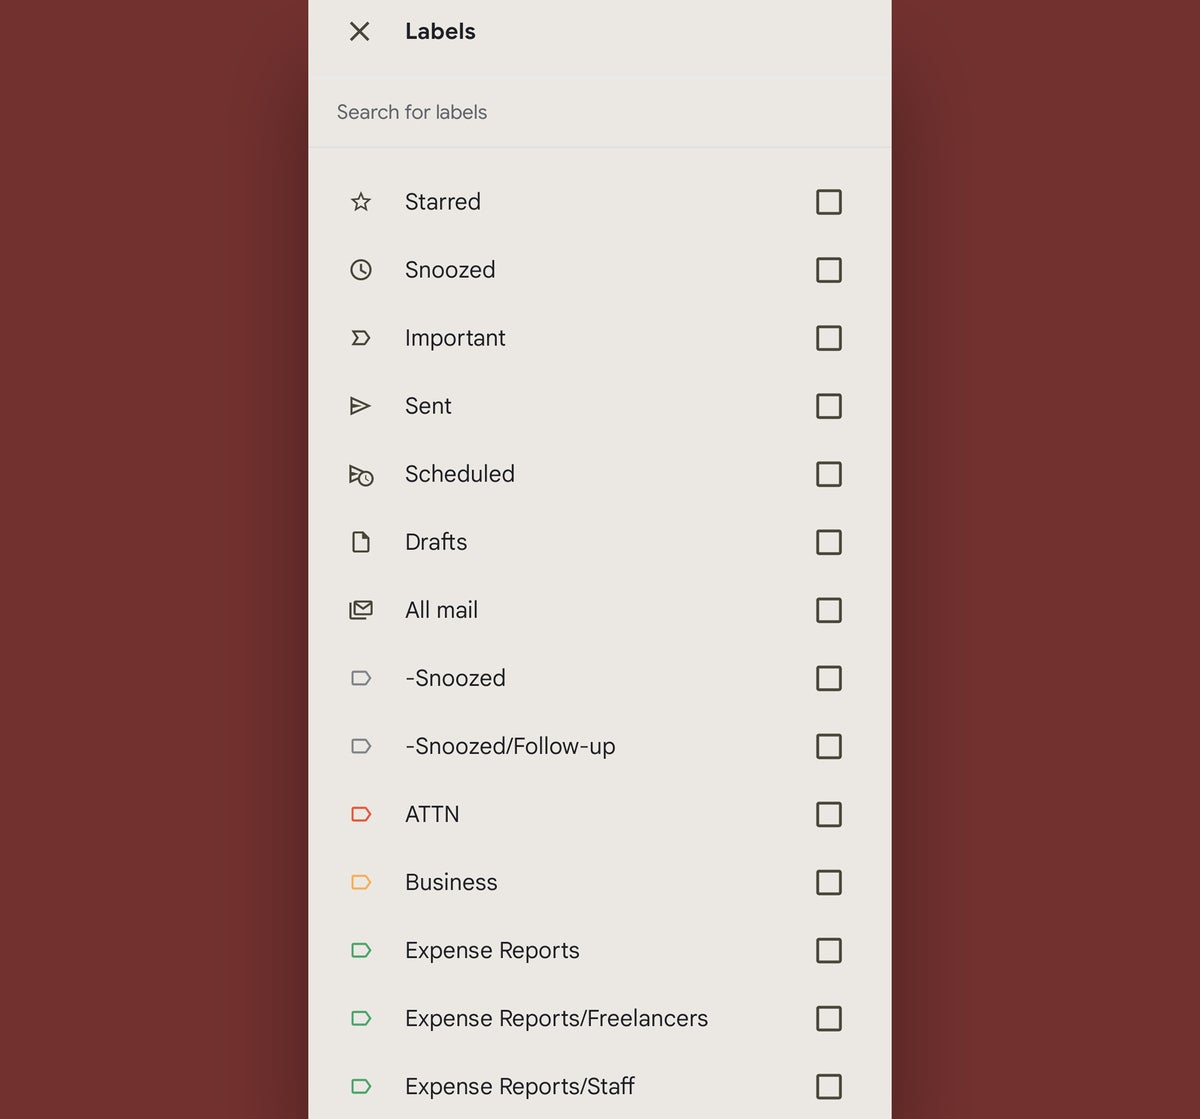
And on the mobile front, you can make your life easier yet by tapping the « Labels » dropdown within the app’s search area. That’ll let you simply select from a list of available options and save yourself the trouble of manually typing anything in.
 JR Raphael/IDG
In the Gmail mobile apps, you can select from a list of existing labels instead of typing in a search.
Gmail actually treats many of its own built-in message designations as labels, too — so in addition to searching for your own custom labels, you can search for (and in some cases also find within the mobile app dropdown menu) things like:
- label:inbox
- label:unread
- label:promotions
- label:social
- label:starred
- label:muted
Beyond that, you’d never know it, but Google also supports a hidden series of advanced Gmail labels for automatically identifying emails related to areas like travel, purchases, and finance.
And finally, any recent past searches you’ve conducted will show up as suggestions whenever you tap or click in the search box, which makes it especially convenient to revisit any frequently accessed label-related explorations in the future.
7. Let Gmail apply labels for you
Here’s where things really start to get interesting: In addition to manually applying labels to messages as you see fit, you can train Gmail to automatically categorize and process messages for you.
The first step is to think about what factors would make an incoming message fit into a particular label — whether it’s the sender’s email address or domain name, a specific word or phrase in the subject line, or maybe even the address to which the message was sent.
In my own inbox, for example, Gmail applies a red « VIP » label to emails that arrive from editors or other contacts whose messages tend to be timely and important. And it applies a green « Invoices » label to messages that come in from the address quickbooks@notification.intuit.com and with certain subject lines that my accounting software uses for carbon copies of new invoices.
In some cases, like with the « VIP » label, the messages remain in my primary inbox. But in others, they end up moving to less attention-demanding places — like the invoice copies, which skip over my inbox entirely (since I’m keeping them mostly as records and don’t need to be bothered dealing with them every time they come in).
Once you decide what factors should apply to what label — and what else should happen once the label is applied — a Gmail filter is the key to making the magic happen. I outlined the exact steps to setting one up in my separate Gmail filters guide. Go have at it!
8. Let your labels limit your notifications
Last but not least, instead of getting distracting alerts for every new message that lands in your inbox — or going to the opposite extreme and not getting any email notifications whatsoever — use your Gmail labels as a way to control which messages alert you.
You can pick any label that seems notification-worthy and then limit your notifications only to messages with that label attached. You can even set up label-driven notifications to function on your desktop computer and on your mobile device. (Provided you use Android, that is. Sorry, iPhone folks, but Apple’s garden doesn’t allow this level of customization to fly.)
That’s exactly what I do with my aforementioned « VIP » label, in fact. And it’s actually quite easy to set up. I put together a step-by-step guide here.
And with that, my inbox-dwelling comrade, your label education is complete. Go ahead: Label yourself organized. You’ve earned it.
This article was originally published in November 2019 and updated in April 2023.
Copyright © 2023 IDG Communications, Inc.


![[2023] 6 façons de copier / coller du texte brut sans formatage](https://media.techtribune.net/uploads/2021/03/5-Ways-to-Copy-Paste-Plain-Text-Without-Formatting-on-Your-Computer-shutterstock-website-238x178.jpg)


